
Getting started with phpMyAdmin
This guide was written Oct 2017, changes to tables and databases are bound to occur as the Molerat DTB migrates from MS Access to MySQL.
For simplicity, this guide will assume that you have watched the Codeschool introduction videos to SQL that are stored on the server. For that reason I will not go into detail on what each command does if it appears in those videos, only which one to use. The videos themselves can be found at “\\KRCSERVER\91_General\06_MANUALS\Tutorials\MySQL”.
As your queries grow more and more complex you are encouraged to write them in a proper text editor made to handle code (e.g. Sublime or Notepad++) and then copy them from there into phpMyAdmin since you most likely do not have permission to save anything outside of any personal database Tim has set up for you.
Logging on
Before you can even read the data in the molerat database you will need an account. You get this by talking to Tim Vink and having him set it up for you. Once he has set this up for you, find a computer connected to any of the KMP-networks, all of the desktops on site should be connected be cable at all times and your laptop will work just fine if you connect it to the WiFi. From your computer of choice, open a browser window and connect to http://192.168.88.6/phpmyadmin/.
phpMyAdmin
Here you will be prompted to enter you Username and Password, do so to login (keep in mind that everything in phpMyAdmin and SQL is case-sensitive) to find yourself at a screen looking something like this. 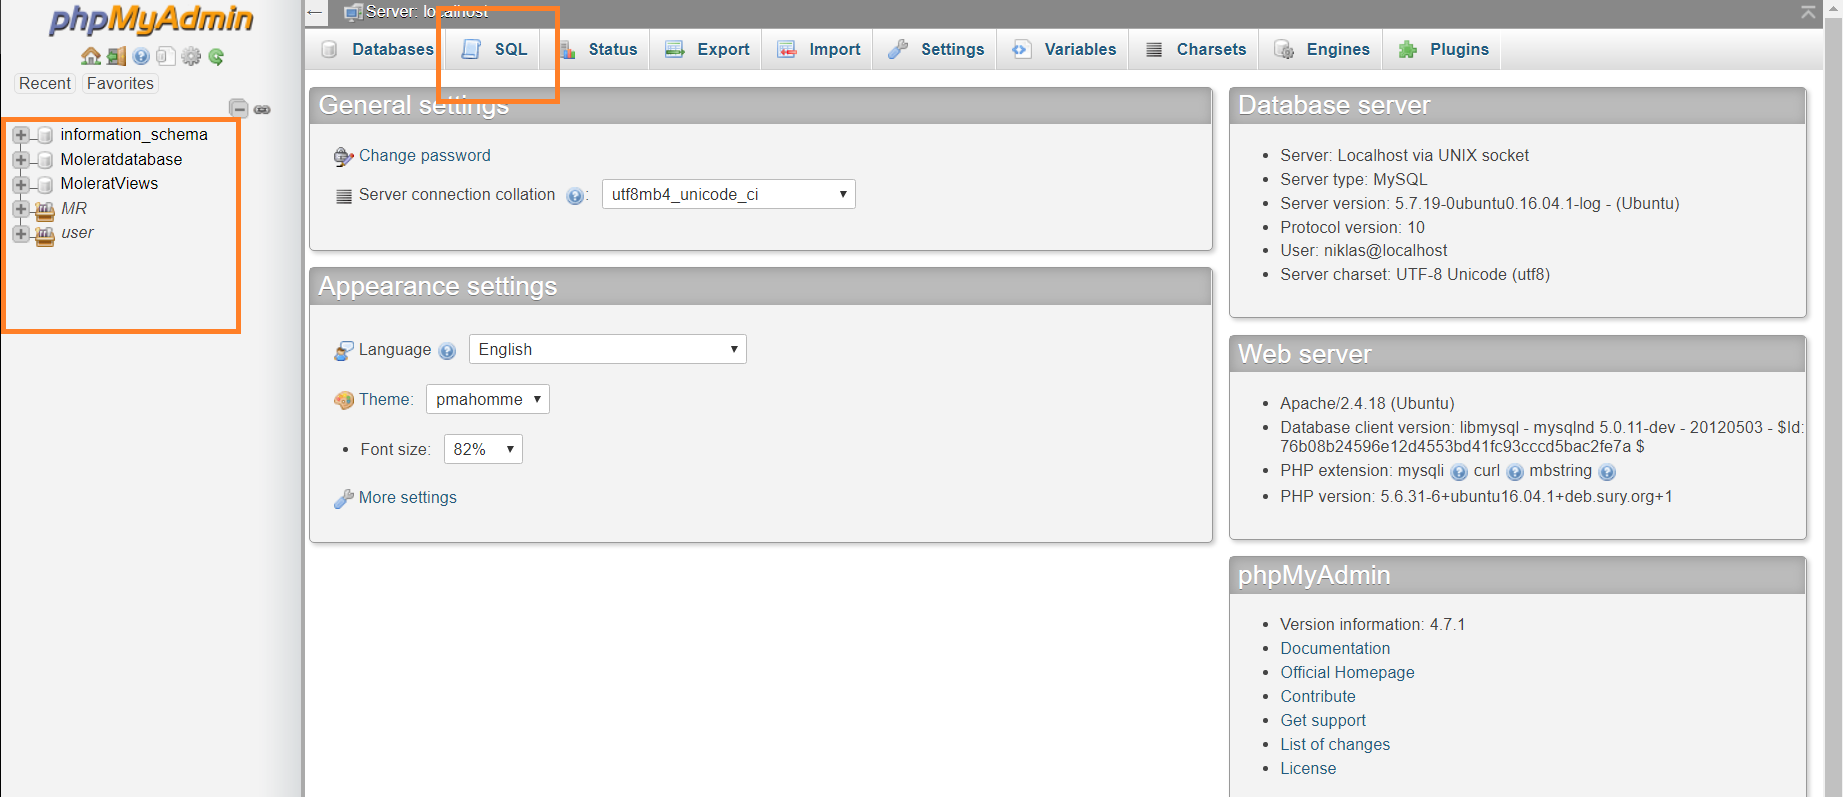
See that little SQL button at the top? Leave it alone for now and move your gaze to the list on the left side of your screen. This is the list of all the databases you are currently permitted access to, and if you click the little plus-sign to the left of the name of each individual database you will find a list of all the tables they contain. Tim should have given you permission to Select from all the Molerat-data, which at the time of writing will be stored in the three different databases Moleratdatabase,MR and MoleratViews. Open MR -> MR_MainData -> tblWeights and you will find yourself in a read-only view of it with a grey box containing some SQL-code in it near the top.
What you just did with that clicking was select MR_MainData as your current working database and then opened the weights table. phpMyAdmin will assume that any FROM statement in your code refers to a table from MR_MainData unless you specify another database (we will return to this in a bit).
Currently, the code in the SQL-box should read:
SELECT * FROM `tblWeights`
Recall from the Codeschool-tutorial that SELECT * is how you you get an entire table, in most cases you do not need every single column, your analysis project will not care who weighed each of your animals, so let us get rid of some of all that (to us at this very moment) useless information.
At the bottom of the SQL-box you will find the “Edit inline”-button, press it and you can edit the code so that the table will be displayed to you in another fashion. Change the code to (SQL does not care about row breaks and indents, use them freely to keep your code neat and tidy)
SELECT AnimalID, AnimalRef, DateWeighed, Weight
FROM `tblWeights`
Then press “Go” (or Ctrl+Enter on Windows).
You now have all of the weights collected from all animals with the corresponding date and AnimalID for most of them. If you press the double arrow-button pointing to the right you will go to the end of the table and see what I mean by “most of them”. To speed up as well as simplify the process of recording weight we are now only storing the RowRef of each animal in this (and other) table. Unless you plan on setting up your own database you do not have to know why this is, but simply put, the database works faster if it is allowed to work with the primary key of a table rather than all the other data stored in it. For you however, this means that there is no easy way to find out what animal a certain weight belongs to. For any single animal this is not too much of a problem as you can simply look up the AnimalRef with a
WHERE AnimalRef = SomeNumber
and sort according to date. However, let’s say we want all the animals of a certain colony, suddenly looking up all the AnimalRef’s becomes a bothersome process as tblColonyMembership uses AnimalID, and not Ref.
This is where the JOIN function comes into play. Remember that JOIN lets you join two or more tables next to each other to make a new one containing any of the data from the two. Using a JOIN you can get the corresponding AnimalID for each AnimalRef from tblAnimalID. However, remember how I said earlier that when you clicked MR you chose it as as your working database? As you might have noticed, tblAnimalID is not to be found in MR, but in Moleradatabase. If you try to join a table from one database to one from another database without specifying which is from which (like below) you will only receive an error message.
SELECT *
FROM `tblWeights`
INNER JOIN tblAnimalID
ON tblWeights.AnimalRef = AnimalID.Rowref r
The way you tell SQL this is by typing the name of the correct database in front of the table name followed by a period, the same way you refer to the specific column you want to join your tables. Once you start doing this it is generally considered a good idea to assign an alias to each of your tables as this will make your code easier to write and read. The way to do this is by following your call to a certain table with “AS AliasOfYourChoice”. The alias can be anything you want, but if the alias is also a SQL-function e.g. DATE you will have to put it inside of
SELECT *
FROM `tblWeights` AS WEIGHTS
INNER JOIN Moleratdatabase.tblAnimalID AS ID
ON WEIGHTS.AnimalRef = ID.Rowref
Since we used SELECT * again the resulting table will be more than a little cluttered with stuff we do not need, plus the AnimalRef and AnimalID columns both appeared twice, once from tblWeights, and once from tblAnimalID. Once again you only want the data that is of interest to you as this increases readability and decreases the amount of confusion down the line. With all of this data at your disposal you no longer need to see the AnimalRef, but you want to see the AnimalID that you lined up nicely with it from tblAnimal. But as previously mentioned, AnimalID now appears twice, so you have to be specific about which AnimalID-column you want returned. Fortunately for you, the alias you created for your table to use in the ON-part of your INNER JOIN also works to specify which table you want your columns from, so by running the following command:
SELECT ID.AnimalID, WEIGHTS.DateWeighed, WEIGHTS.Weight
FROM `tblWeights` AS WEIGHTS
INNER JOIN Moleratdatabase.tblAnimalID AS ID
ON WEIGHTS.AnimalRef = ID.Rowref
You can specify where you want to get your AnimalID’s from. Easy.
Using joins like this allows you to connect all the Molerat data from across all of our databases. While a little fiddly from time to time, this allows you to, for example, join a table to the queries from MoleratViews. So if you want to make a query with all the live animals from a certain colony you won’t have to start by writing a query that joins up tblColonyMembership with tblColonyCodes, finds the current colony of each animal and then deselects all the dead and otherwise uninteresting animals from the resulting table. Furthermore, due to inconsistencies in the the database you will most likely find that some tables will use experiment names like “LHAM”, “CrossFoster” or “SIOD” and others will use the ExperimentRef, in this case you might have to add an intermediate table (in this case tblExpDescript) to join the two together, as that can be the only way for the two tables you are actually interested in to find something in common. Of course, you do not have to display anything from your intermediate table in your final results.
I strongly recommend that you familiarise yourself with the MoleratViews database as the queries in there can save you a lot of time.
Subqueries
Subqueries are, simply put, queries within queries. As you have no doubt already noticed from the previous part of this introduction,each query you run will produce a new table. By wrapping your query in a parenthesis and giving it an alias you can then call on the table produced by your query. While adding a certain layer of complexity to your query, subqueries will prove essential to you if you ever want to make use of array functions (e.g. MAX, MIN, SUM). The reason for this is that the GROUP BY statement often accompanying an array function, the one that makes sure you, for example, see the max weight of each animal in tblWeights instead of the max weight stored in the table will often assign a random value to fields of a certain column (for reasons unknown to the author).
This is where primary keys (PK) (often the RowRef of the table) become useful. By querying out the PK associated with a certain entry you can INNER JOIN your subquery back on the table on the PK and only have the rows of interest with no risk of messing up the table.
In addition to the above, SQL can only handle so many different commands in one query. If you, for example want to make a query where you find the age of each molerat at the day of death as well as what experiment, if any, they belonged to you would have to:
- Find the date of death of each animal that has died in the lab.
- : This could be accomplished in two ways, either by finding all entries for animals being moved to colony 120 (DEATH) in tblColonyMembership or finding all the death-events in tblLifeHistory, then extracting date and AnimalID.
SELECT AnimalID, DateMoved
FROM `tblColonyMembership`
WHERE ColonyRef = 120
- Find the date of birth for these individual
- : Once again you could do this through the use of either the Lie History of Colony Membership-tables. Either by finding all the birth events or the MIN date of entry in a colony for each animal.
SELECT AnimalID, MIN(DateMoved)
FROM `tblColonyMembership`
GROUP BY AnimalID
- Calculate the difference between the two dates after joining the two tables together (Notice that I provide an alias for the two DateMoved, this is to avoid confusion and to make the code easier to read and write.
SELECT DEATH.AnimalID, DATEDIFF(DEATH.DDAY, BIRTH.BDAY)
FROM (SELECT AnimalID, MIN(DateMoved) BDAY
FROM `tblColonyMembership`
GROUP BY AnimalID) AS BIRTH
INNER JOIN (SELECT AnimalID, DateMoved AS DDAY
FROM `tblColonyMembership`
WHERE ColonyRef = 120) AS DEATH
ON DEATH.AnimalID = BIRTH.AnimalID
- Find the last experiment each animal belonged to. Remember what I wrote about the GROUP BY statement earlier.
FROM (SELECT RowRef
FROM `tblExperiments`
GROUP BY AnimalID
HAVING MIN(DateStart)) AS REF
INNER JOIN tblExperiments AS EXP
ON REF.RowRef = EXP.RowRef
- Join all of this together. From here on out you should understand how this will work (if not, consider it some good practice), just keep adding more JOINs. Most likely you will also want to JOIN the tblExpDescript onto all of this since you’ve only got the experiment reference, not the experiment name. How you want to do that is up to you, you can either add it to the subquery where you extract the experiment (my preferred method), add it to the final product as a new line, or any other way you can think of and like.
Final comments
As your block of code becomes longer and longer it will prove more difficult to keep track of why you joined in a certain table or what a particular branch of subqueries actually does. For that reason I would strongly recommend that you make liberal use of comments in your code. A line of text preceded by a # will be ignored by MySQL, so you can leave it in your code to help you remember what everything does without causing any Syntax errors.
Finally, make sure you think through your query before you start to write it. It is easy to imagine the end result, but any moderately complex query will contain many tiny steps. Stop and think what information you will need from the DTB to get your end-results, otherwise your query will end up a huge jumble of code that is tough to both write and read.